
Using Mists in place of Paint or Inks
My first two projects are going to show you how mists can be used to replace paint,
starting with one of my final projects created for ScrapGal.


Next I decided to add a few droplets of each color to the page for a more artsy feel. And to coordinate with the color of my title and the paper I used to mat each photo.
I would say the most time consuming part of this layout was scanning the photos and creating the collage. Everything else came together quickly.
Next project...

Now for two examples where mists can replace inks!
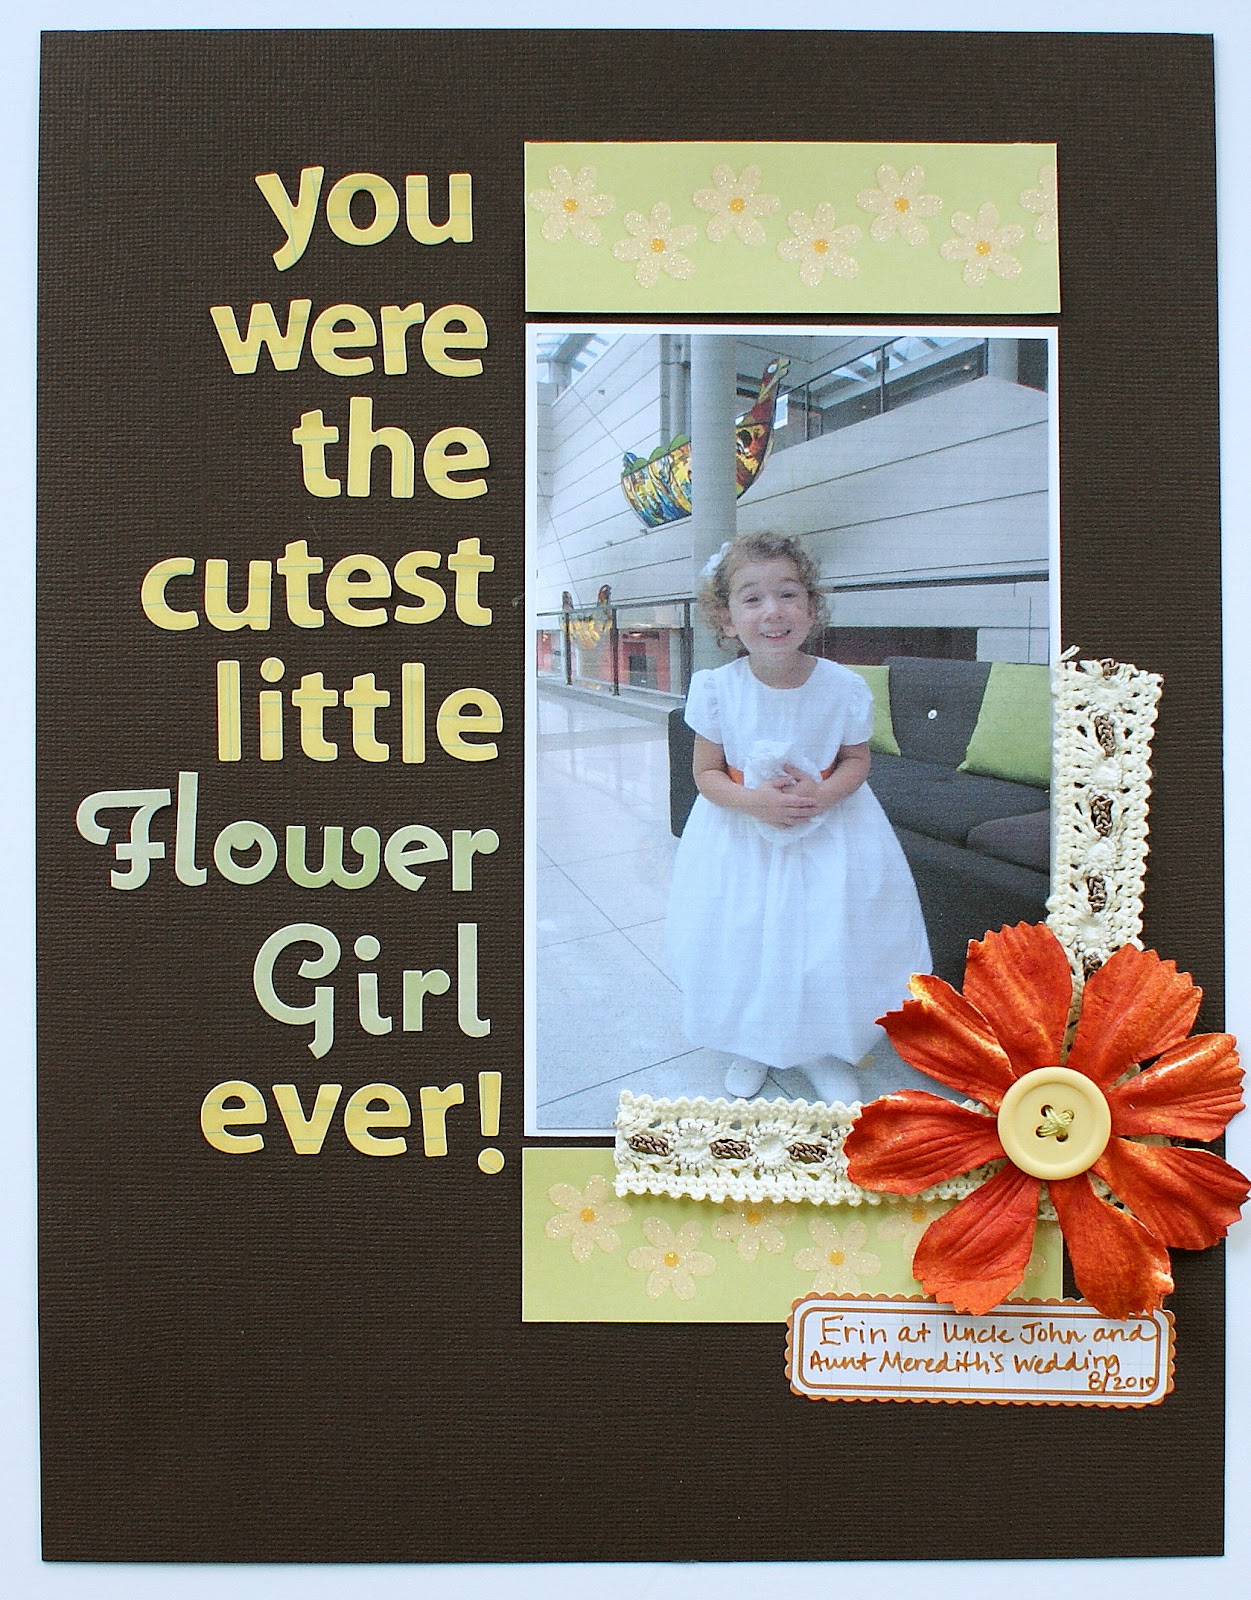

I grabbed my Bubblegum Metallic and Sunflower Yellow mists by Maya Road and sprayed until the color matched. I started with pink and then sprayed yellow over it. I wasn't sure if it would work or not, but I did end up with the perfect orange/rust color. Talk about a successful experiment! That doesn't happen to often in crafting for me :)

For this layout, I literally sprayed my acrylic stamp lightly with four different color mists and stamped onto white cardstock. Then I hand cut out each image and used it as a frame for the different parts of my layout.
One thing I have learned about mists and stamping is that it can be a little hard to control the amount sprayed onto stamps, so you are not going to typically get a clean, stamped image. But I was ok with that for this layout, because of the word bubbles on the patterned paper. I liked the cartoonish feel of the stamped image, and I wasn't looking for perfection.
As for mists themselves, so far I have only used mists by Maya Road, Studio Calico, Tattered Angels and Tim Holtz. I have yet to try the October Afternoon Sprinklers, but plan to soon. Would love to know your thoughts on the OA mists if you have used them!
*EXTRA TIP* I have noticed that the Tattered Angels and Tim Holtz mists *will* make you papers curl up. Especially if sprayed on the background. I did not have that problem with the Studio Calico and Maya Road mists. So any kind of large surface or background spraying will be reserved for my SC and MR mists!
But the Tattered Angels and Tim Holtz work really well as a "paint" substitute or for droplets. And that is probably what I will use them for most. I especially love the Tattered Angels glimmer mists for coloring chipboard since it has such a nice shimmer to it.
And again, I would love to see any projects you have done or plan to do using mists in place of paint or ink!
On Friday, I will be discussing one of my favorite ways to use mists - Masking!
These are all amazing!
ReplyDeletegreat work on all your projects!!! i am just in love with misting!! it is so fun!!
ReplyDeleteLots of great stuff you shared here! I especially love the page of your son's drawings!
ReplyDeleteThanks for all the tips! I love that 1st layout, your son is super talented!!!
ReplyDeleteI really am enjoying this weeks posts! Thanks for sharing the tips with us.
ReplyDeleteThese are great projects! I especially love what you did with your son's artwork!!!
ReplyDeleteI love the layout you did with your son's artwork! That banner is also wonderful, I have been a huge fan of banners lately!
ReplyDeletethis is fun, i love seeing your misted work.
ReplyDeleteVery cute! Great tips!
ReplyDeleteWow...your son is sure the artist! Love how you scrapped his work. Great projects!
ReplyDeleteAdore! Love the mist.
ReplyDeleteOh, WOW! That first layout is amazing! The rest of them are great, too!
ReplyDeleteGreat post! My first mists arrived in the mail yesterday. Can't wait to start playing!
ReplyDeleteGreat tips! I was so excited when mists took off and companies were making them because I love covering chipboard with them. I love chipboard on my layouts but I don't like to cover with paint or paper. Messy. Misting is perfect.
ReplyDeleteThanks for sharing! I can't wait to get some mists and start playing around with them.
ReplyDeleteYou amaze me with your misting skilz! So cool! I especially love the idea of using it on chipboard. I have a few of the OA Sprinklers and have only used them to dye twill :) They worked great!
ReplyDeleteLove all your projects! And I reallllllly love the misting on the flower!!!!
ReplyDeleteI love everything you do! So happy to have discovered you. :) I especially love the first layout's color scheme.
ReplyDeleteYou know I don't have any mists, and not much of a stamper/inker either. I'm afraid to get one because I know then I'll want all colors. But every time I see a post like yours I want to get a mist to play with. Sigh...
I am loving all these projects and the way you used your mists differently in each one! Great work!
ReplyDeleteWow, I didn't know you could do so much with mists.
ReplyDeleteI don't really use mists. I think I have 4 and only use them to add a bit of shimmer to my projects.
Thanks for sharing.
super cute projects! i love mist!
ReplyDeleteLove these! I am not a big mist girl, but I do have quite a few and love them when I use them.
ReplyDeleteThese are great examples! I really like the one about misting on your stamps - the way you did the frames. I really like how you showcased your son's art (and he is very good!) I bet he feels so special seeing that page!
ReplyDelete